
Let’s skip straight to the point; reading up on and researching which barefoot shoes to buy can be overwhelming. Decision paralysis can hold you back from making the jump (or dipping your toe in!).
Follow this simple quick start guide to barefoot shoes to get started ASAP. The information is for everyone of all abilities and all ages who want to get started with foot-friendly shoes. You can delve deeper later – what will hook you is actually trying them and feeling the benefits for yourself.
Step 1: Measure Your Feet
Barefoot retailers almost always list the interior length of the shoe, if not the sole length. This takes out lots the guesswork of sizing – you don’t need to go by your “usual size” and I recommend you don’t due to varying sizes between brands/models.
When you have your foot length, e.g. 27cm, which is approximately a UK size 9 or EU 43, add some wiggle room for your toes (usually from 0.5cm to 1.2cm, so an interior length of 27.5cm to 28.2cm is good). Sandals require less extra space and children require more for growing room. I prefer the paper tracing method below for better accuracy, but just get your foot length in any way you prefer. Here is what you need to do to get your foot length:
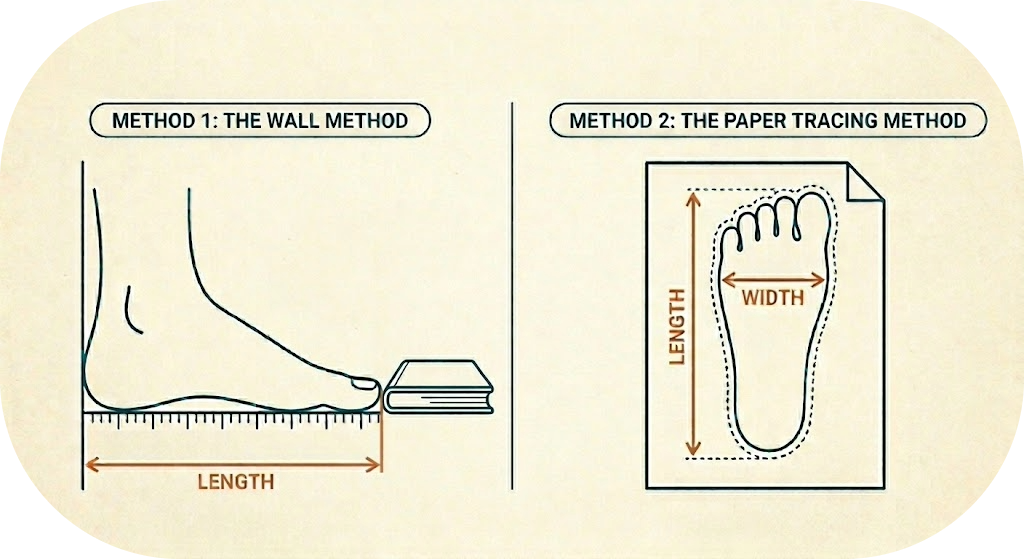
The Wall Method:
- Stand with your heel against a flat hard surface, like a wall. Evening is best, as feet get bigger throughout the day.
- Place a hard, straight object (like a book) parallel to the wall at the end of your longest toe. Make sure you are putting your weight on your foot.
- Remove your foot and measure the distance from the wall to the object to get your foot length in centimetres or inches.
- Repeat with the other foot, in case of size variation. Take the longest measurement as your length.
The Paper Tracing Method:
- Get a sheet of paper that is longer than your foot (cardboard is fine too, but make sure the squashing doesn’t distort the tracing).
- Place the paper on a hard floor and step onto it. Make sure to put your weight on that foot.
- Trace around your foot, keeping the pen or pencil vertical.
- Now take your measurements. Measure from the back heel to the longest point – either a diagonal line to the longest toe, or the distance using a line perpendicular to the toes and heel (as per the infographic below).
- This method also allows to measure width: just measure the widest point of your foot tracing. Some retailers sell multiple widths, or at least provide the width measurement.
Step 2: Get Some Shoes!
Before agonising over the transition, just go ahead and buy some shoes that are within budget, come in your size and that you like enough to wear. I’ve listed some options below, but any barefoot shoe will do! See the below categories for inspiration. Buy one pair to start with and get a feel for what you like.
Budget option: Cheap New barefoot shoes (~ £60 or less for adults, ~£25 or less for kids)
Here are some options that are on the lower end of the price scale. Direct from China shoes can vary in quality, but some there are some great suppliers that are excellent value. Shipping can take some time and returns can be complex, but you can get the best bang for your buck. Check size charts carefully before purchase.
- Aliexpress Tipsietoes barefoot shoes for children and adults. They are an excellent option that use quality materials and good craftsmanship. I have experience with their shoes and can only recommend them for beginners or those already into barefoot shoes alike.
- Some kids models:
- Some adults models:
- Women’s stylish leather sandals (dupe of a more expensive brand – Shapen!)
- Unisex / Men’s high top leather trainers
- Storefront – many more models available: loafers, ballerinas, etc.
- Aliexpress (also on Amazon, usually at a higher price) barefoot shoes, like Hobibear trainers. These are cheaper than the above, but materials and barefoot credentials are lower (as in, slightly narrower toe boxes and use of cheaper materials):
- Some kids models:
- Some adult models:
- Storefront – NB: not all their models are fully ‘barefoot’ – read the title and description to look for keywords like ‘barefoot’ and ‘zero drop’.
Another option is buying them from high street shops, which are increasing their selection constantly. Kids shoes may be more easily found in-store as adults models are currently mostly online only.
- Zara, a selection – search their site for ‘barefoot’ if you want to see more models. These are an excellent price and easily can be returned:
A third option is second hand! There are dedicated reselling groups on Facebook and there are options like Vinted and eBay. Some websites resell their own branded shoes secondhand too, such a Revivo for Vivobarefoot.
- Revivo – the official reseller of Vivobarefoot second hand shoes.
- Vinted, eBay, etc.: search for ‘barefoot shoes’ if you are unsure what brands to buy. If you have a brand in mind you can search specifically for those.
- Facebook groups: UK barefoot sales group, UK barefoot “friendly” sales group, Another UK sales group, Global / US-mainly barefoot sales group. (There are groups for other regions, just search on Facebook).
Step 3: Begin the Transition
How slow you need to go is personal, but jumping in from a lifetime of conventional shoes means you may cause injury. Your muscles will be used in ways they haven’t been before and will become fatigued easily.
Once you have a pair of shoes, I recommend the following:
- Wear them around the house daily. Start with an hour or so for the first few days. If your feet or legs feel sore or fatigued, just keep to indoor use until they adjust.
- Move on to wearing them outside for short walks, no longer than 15-20 minutes or so. Again, try this for a few days and wait for your feet to adjust.
- You can then start wearing them for longer walks, on errands, etc. don’t increase mileage much, because any injury will set back your progress.
- Once walking comfortably, you can introduce some sports if you wish. Low impact sports like weight lifting will be of little issue. Running needs to be taken very slowly! Start with short runs and ensure you adjust your gait so that you are not over striding or coming down hard on your heels. Your running form will need to change, most likely.

Some tips for the transition:
- If the sensation is too much and you want more cushioning, add a flat insole with no arch support/contouring. This also helps fill out shoes that might feel a bit big.
- If you buy what appears to be the right size and they feel a little bit big, keep in mind your toes and possibly feet in general will spread and even lengthen slightly. This is a sign your feet were being compressed in conventional shoes, not a bug!
- You can buy specific “transitional” shoes that are not barefoot. They usually compromise on the sole thickness or the drop from heel to toe. These can be useful for some, but there is a risk you will soon “outgrow” them and wish for something more minimal.
- Over time you will probably be using your “normal” shoe collection less and less, to the point you may want to replace them all with barefoot shoes. Many people find returning to conventional shoes awful after realising how shoes should feel.
Hopefully this guide was of some assitance – check out the link below to dive deeper into what makes a barefoot shoe and the why of transitioning.